A story is a series of videos, or audios, or images, or animations, or texts that belong together, and thus tell a story. Have you ever thought of what Twitter Fleets, Facebook Stories, Instagram Stories, and Snapchat Stories have in common? Well, they are all so-called social media implementations of the same story idea.
Visual storytelling is huge and now, the web has an open story format as well. Google’s Web stories are now available in WordPress as it was launched back in 2018 as AMP Stories.
What are Web Stories?
Web Stories are a swipeable web-based rich visual storytelling version of the popular Story format for use on mobile devices that blend video, audio, images, animation, and text to create a lively experience. Web Stories offer a Full screen experience that can incorporate every type of content imaginable.
Web Stories bring a familiar full-screen, tappable story format to the wide audience on the web. Web Stories are open and freely distributable in contrast to closed formats like Instagram Stories. You own your stories and can make and publish Web Stories on them.
Right at the top of Google search results, Web Stories has its own place. That’s not all because stories can also appear very prominently on Google Discover, Google Images, and the Google app.
Web Stories give you much more control over how you publish and what you publish. You are free to determine where you publish, the format to use, and how long you want a story to ‘live’. These stories offer you a quick and easy-to-digest type of content because they are very fast.
Keep in mind that, every story automatically gets a simple desktop viewer as Web Stories are intended for use on mobile devices. Meaning your mobile content is truly available for everyone.
Goodbye AMP Stories, hello Web Stories
As a way of quickly building visual stories for the web using open technologies, Google introduced AMP Stories in 2018. AMP Stories became Web Stories in May 2020 and was launched on the number one platform in the world: WordPress by October 2020. The Web Stories plugin for WordPress has made it so much easier to build stories on the platform that you own: your website.
Google has announced that some of its other tools like the Rich Results Testing Tools and Search Console can now recognize Web Stories as such. While also pushing for the adoption, Google continues to make improvements to Web Stories. You can set the tracking ID for Analytics in the settings of the WordPress plugin. This helps you get a sense of how your Stories are performing.
Examples of Web Stories
Web Stories can be used for a lot of things and many big media brands have been seen doing so. While it seems they are the best fit for bite-sized content, you can go pretty deep with your stories. People might flock to it if you can build an engaging story. This is just the thing that might make your content go viral.
Here is a cool example of a Web Story made by CNN about Antarctica.
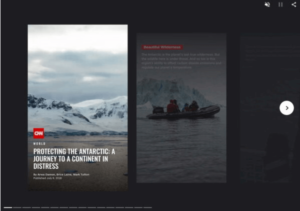
This is a fairly high-level Web Story and of course, you must not use the same journalistic approach to create yours. The most important thing is to make sure your stories are high-quality and valuable to you and the reader.
How to build Web Stories with the WordPress plugin
If you have a WordPress site, getting started with Web Stories is easy and simple. Just install the official Google Web Stories Plugin. To get your story ready for the search engine, don’t forget to read Google’s documentation.
The plugin is simply a work of art that was developed in the open by an awesome team of Google developers. It has now launched officially, so everyone can get building stories.
Go straight to the Editor Settings and fill in the details asked after you have installed the plugin. Then you are good to go. Please explore the template section if you want to get a sense of what a Web Story can be or if you lack inspiration.
If you see anyone you like, click use template and the editor opens with the template. Now you can use the various tools to adapt the story to your liking.
Steps to Build Web Stories from Scratch
- Open the Web Stories plugin
Start a new story after installing the plugin by clicking Create New Story from the Web Stories Dashboard. You can also start a new story by hovering over the WordPress menu > Stories > Add New.
- Introducing the Web Stories interface
The Web Stories interface opens with a blank template if you make a new story. If you look at the left-hand side, you will see the materials you can use in your story and the asset manager with the images you have uploaded before.
- Add an image to explore the right-hand side
Now click on the blue upload button and pick an image to upload. Add it to the canvas by double-clicking the image and you will notice that the settings on the right-hand side will change. Now you can see the properties and design options for each item. Bear in mind that these differ from type to type, and so images have different options from texts.
- Get accustomed to the interface
The interface of the Web Stories WordPress plugin won’t appear very strange to you if you are conversant with any kind of design tool. Almost everything you would need like layer, align, change text type, colours, and rotate is on this interface. You can also work with images, text, illustrations, videos, etc.
- Now try to build a simple Web Story
It’s time to build your own Web Story. To get started, open a new story and upload an image. Now click on the image and you will notice the lines around it, which enables you to scale, rotate and zoom the image. You can double click on the image to see the full image and how it fits and if you don’t like the way it fits in, you can make it fit in the way you like.
- Add text to your Web Story
To go to the text tab, click the T on the left-hand corner and you will see the different sizes. They are based on regular HTML headings with h1 as the biggest one and a paragraph gets a p. Use the p for your paragraphs, h1 for your title, and h2 or any other for your subheadings. Make sure to use these correctly in your Web Story. This way, your web content will follow all regular guidelines.
- Colours, fills, and alignment
You will need to have a background fill colour or give your text a colour to stand out if your image has a busy background. To add a heading to your image, click on Heading 1 then drag and drop it where you want it to appear.
- A new page for your web story
Click the big plus sign (+) button at the bottom of the screen to add a new page to your story. Click on Duplicate page, if you want to duplicate the current page because you would like to use that as a template for the next screen. Fill your story with all the pages you need.
- Link to your site
The fact that you can freely link out to your own content is one of the cool things about Web Stories. You can do this simply by clicking on an element and then add a link. Ensure to keep the number of links limited, don’t overdo it.
- Fill in metadata and publish
Click preview to test your Web Story once you are done with it. You need to fill in some metadata to improve the story before you hit Publish. According to Google, to have a valid Web Story you need this. Click Document and fill in the logo, cover image, excerpt, and pick a good permalink.
Having done all these, you are now ready to publish your story so go ahead and hit publish. The Web Stories plugin will ask you if you want to make a new post for this story. If you do, click the button and a new post will open with your story embedded in it.
This simple story is purely meant for you to find your way around the web story interface.
Remember
The Web Stories plugin will ask you if you want to make a new post for this story. If you do, click the button and a new post will open with your story embedded in it.
Here are a couple of things to take into account:
- Ensure that the URLs of your story are available in your XML sitemap
- To make it easier for Google to understand your stories, add schema structured data.
- Make sure your stories are of high quality and valuable
- From other relevant parts of your site, link to your stories
- You can add ads, but don’t overdo it
- Don’t add too many links to outside sources
- Keep the story short and snappy
- Keep the title short
- Don’t use too much text on pages
- For accessibility, add alt text to describe images
- Stories are ideal for video, but keep them short


Pingback: What are Google Web Stories? - MMO Guide